IDEA插件开发学习
初始化插件工程
在GitHub页面使用官方模板创建一个仓库

git clone仓库到本地,使用idea打开配置Gradle镜像:修改
build.gradle.kts文件,在20行左右添加如下配置kotlin// Configure project's dependencies repositories { maven { setUrl("https://maven.aliyun.com/repository/public/") } maven { setUrl("https://maven.aliyun.com/repository/spring/") } mavenCentral() }新增版本(必需,否则运行报错):修改
CHANGELOG.md文件,在最下面新增如下内容markdown## [1.1.0] - 2019-02-15 ### Added运行,右上角已有现成配置,点击
Run Plugin即可
参考范例
- 官方Code Samples
- 首先参考project_view_pane项目,结合官方文档一起
- 找到官方debugger对应的代码位置:
com.intellij.xdebugger
实现
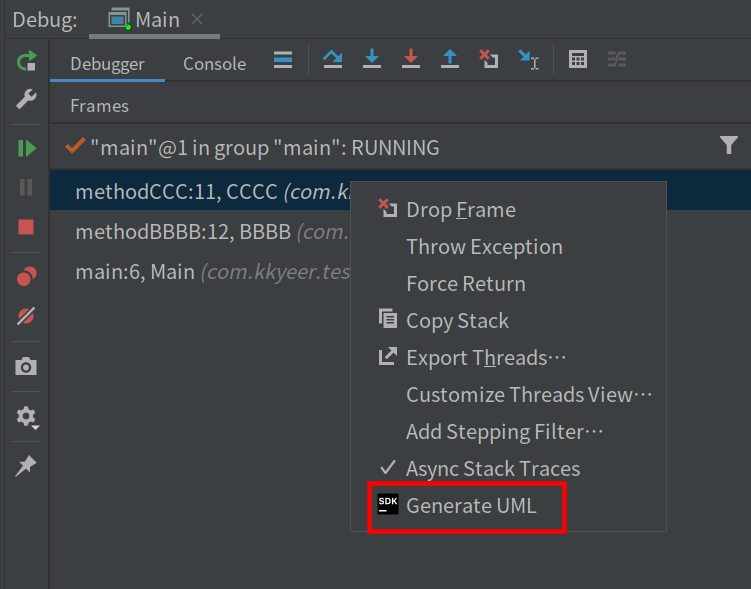
- 尝试在Debugger窗口加一个按钮,参考action_basics
新建一个类,继承
AnAction类:public class ToUmlDebuggerAction extends AnAction{...}在
plugin.xml文件里配置Action:xml<action> <action id="myAction" class="com.kkyeer.debugger.to.uml.ToUmlDebuggerAction" text="My Action" description="My action description" icon="com.kkyeer.debugger.to.uml.icons.SdkIcons.Sdk_default_icon"> <add-to-group group-id="XDebugger.ToolWindow.LeftToolbar" anchor="last"/> </action> </actions>尝试获取DebuggerFramesList:参考类
com.intellij.xdebugger.impl.frame.XDebuggerFramesList
- 因为用的是JavaFrame,所以需要改动依赖变为IDEA专属,参考官方资料
- plugin.xml的配置修改:depends改为
<depends>com.intellij.java</depends> - gradle.properties的配置新增:
platformPlugins =com.intellij.java - runIDE,效果达成
- plugin.xml的配置修改:depends改为
- 接下来需要考虑时序图生成
生成时序图
各种搜索后,准备参考这个插件的代码SequencePlugin,尝试后发现耦合度相当高,抽离需要付出相当大的精力,暂时作为PLAN B。 继续搜索后从这里找到灵感,准备使用PlantUML+GraphViz的组合实现,效果参考
PlantUML
官网,示例:
@startuml
participant Participant as Foo
actor       Actor       as Foo1
boundary    Boundary    as Foo2
control     Control     as Foo3
entity      Entity      as Foo4
database    Database    as Foo5
collections Collections as Foo6
queue       Queue       as Foo7
Foo -> Foo1 : To actor
Foo -> Foo2 : To boundary
Foo -> Foo3 : To control
Foo -> Foo4 : To entity
Foo -> Foo5 : To database
Foo -> Foo6 : To collections
Foo -> Foo7: To queue
@enduml
IDEA展示图片
先使用较简单的弹窗展示图像:https://plugins.jetbrains.com/docs/intellij/dialog-wrapper.html#dialogwrapper
Swing默认不支持SVG,解决方案:https://xmlgraphics.apache.org/batik/
发布插件
补充信息,参考官方文档
- 注意,插件介绍不要配置在plugin.xml中,打包的时候会强制从
README中读取,配置在Plugin description部分后面
- 注意,插件介绍不要配置在plugin.xml中,打包的时候会强制从
签名,根据官方文档生成签名,注意,生成签名后,不要按文档描述将key文件内容复制到环境变量,需要如下改动
build.gradle.kts文件,并将2个文件路径配置到环境变量,原因为环境变量多行文本配置需要特别注意kotlinsignPlugin { certificateChain.set(File(System.getenv("CERTIFICATE_CHAIN")).readText()) privateKey.set(File(System.getenv("PRIVATE_KEY")).readText()) password.set(System.getenv("PRIVATE_KEY_PASSWORD")) }在官网登录并上传插件
附:生成签名
Generate Private Key To generate an RSA private.pem private key, run the openssl genpkey command in the terminal, as below:
openssl genpkey\
-aes-256-cbc\
-algorithm RSA\
-out private_encrypted.pem\
-pkeyopt rsa_keygen_bits:4096
After that, it's required to convert it into the RSA form with:
openssl rsa\
-in private_encrypted.pem\
-out private.pem
At this point, the generated private.pem content should be provided to the signPlugin.privateKey property. Provided password should be specified as the signPlugin.password property in the signPlugin configuration. As a next step, we will generate a chain.crt certificate chain with:
openssl req\
-key private.pem\
-new\
-x509\
-days 365\
-out chain.crt
The content of the chain.crt file will be used for the signPlugin.certificateChain property.
评论